FrameLayout – Android Layout Tutorial Series-3/5
Introduction to FrameLayout
FrameLayout : is designed to block out an area on the screen to display a single item. Generally, FrameLayout should be used to hold a single child view, because it can be difficult to organize child views in a way that’s scalable to different screen sizes without the children overlapping each other.
You can, however, add multiple children to a FrameLayout and control their position within the FrameLayout by assigning gravity to each child, using the android:layout_gravity attribute
Each layout has a set of attributes which define the visual properties of that layout. Among them some Common Attributes used in FrameLayout via .xml file.
| Attributes Name | Use |
| android:id | ID which uniquely identifies the viewIt would be any name.Ex. android:id=”+@id/id_name” |
| android:layout_width | Width if the layoutYou can given width as like below,- fill_parent : Covers all the areas of parent view width wise.
– wrap_content : Covers width based on your content’s size. – match_parent : Contains as much width as its parent has. Ex. android:layout_width=”fill_parent” Or you can specify int value as well, which is counted as dip value. (Dimensions In Pixels) Ex. android:layout_width=”200dip” |
| android:layout_height | Height of the layoutYou can given width as like below,- fill_parent : Covers all the areas of parent view width wise.
– wrap_content : Covers width based on your content’s size. – match_parent : Contains as much width as its parent has. Ex. android:layout_height=”wrap_content” Or you can specify int value as well, which is counted as dip value. (Dimensions In Pixels) Ex. android:layout_width=”200dip” |
| android:orientation | Defines the manner of the children.- horizontal
– vertical Ex. android:orientation = “vertical” |
| android:layout_gravity | Specifies how the layout will be positioned.There are multiple options available, basic and general used options are,- top : Top side of the parent view.
– bottom : Bottom side of the parent view. – left : Left side of the parent view. – right : Right side of the parent view. – center : Center of the parent view from horizontally as well vertically. – center_verticle : Centered vertically of the parent view. – center_horizontal : Centered horizontally of the parent view. Ex. android:layout_gravity = “center” |
| android:layout_margin | Keeping extra space to each side of the layout.You can give any int value to this field. It will be considered as dip value.Ex. android:layout_margin = “10dip” |
| android:layout_marginTop | Keeping extra space to the Top side of the layout.You can give any int value to this field. It will be considered as dip value.Ex. android:layout_marginTop = “10dip” |
| android:layout_marginBottom | Keeping extra space to the Bottom side of the layout.You can give any int value to this field. It will be considered as dip value.Ex. android:layout_marginBottom = “10dip” |
| android:layout_marginRight | Keeping extra space to the Right side of the layout.You can give any int value to this field. It will be considered as dip value.Ex. android:layout_marginRight = “10dip” |
| android:layout_marginLeft | Keeping extra space to the Left side of the layout.You can give any int value to this field. It will be considered as dip value.Ex. android:layout_marginLeft = “10dip” |
| Android:layout_marginStart | Specifies extra space on the start side of the view.You can give any int value to this field. It will be considered as dip value.Ex. android:layout_marginStart = “10dip” |
| Android:layout_marginEnd | Specifies extra space on the end side of the view.You can give any int value to this field. It will be considered as dip value.Ex. android:layout_marginEnd = “10dip” |
| android:padding | Padding filled to each side of the Layout.You can give any int value to this field. It will be considered as dip value.Ex. android:padding = “10dip” |
| android:paddingTop | Padding Top filled to each side of the Layout.You can give any int value to this field. It will be considered as dip value.Ex. android:paddingTop = “10dip” |
| android:paddingBottom | Padding Bottom filled to each side of the Layout.You can give any int value to this field. It will be considered as dip value.Ex. android:paddingBottom = “10dip” |
| android:paddingRight | Padding Right filled to each side of the Layout.You can give any int value to this field. It will be considered as dip value.Ex. android:paddingRight = “10dip” |
| android:paddingLeft | Padding Left filled to each side of the Layout.You can give any int value to this field. It will be considered as dip value.Ex. android:paddingLeft = “10dip” |
| Android:paddingStart | Padding to the start edge of the view You can give any int value to this field. It will be considered as dip value.Ex. android:paddingStart = “10dip” |
| Android:paddingEnd | Padding to the end edge of the view You can give any int value to this field. It will be considered as dip value.Ex. android:paddingEnd = “10dip” |
| android:background | Specifying background image or the color to the layout.You can specify here a drawable image or can provide color too.Ex. android:background = “@drawable/img.jpg” or
android:background = “@color/red” or android:background = “#FF00FF” |
| android:visibility | Defined the visibility of the layout as well its contained children.It contains the value such that whether you want to show the layout and its children or need to invisible it.The values are,- visible : Visible to the end user
– invisible : Invisible to the end user – gone : Remove from the screen. Ex. android:visibility = “gone” |
How to use FrameLayout?
You can set these attributes in the xml like,
<FrameLayout
android:layout_width=<i>"fill_parent"</i>
android:layout_height=<i>"fill_parent"</i>>
<Button
android:id=<i>"@+id/b1"</i>
android:layout_width=<i>"200dip"</i>
android:layout_height=<i>"200dip"</i>
android:layout_gravity=<i>"center"</i>
android:background=<i>"#FF0000"</i>/>
<FrameLayout
android:layout_width=<i>"fill_parent"</i>
android:layout_height=<i>"fill_parent"</i>>
<Button
android:id=<i>"@+id/b2"</i>
android:layout_width=<i>"125dip"</i>
android:layout_height=<i>"125dip"</i>
android:layout_gravity=<i>"center"</i>
android:background=<i>"#FF8000"</i>/>
<Button
android:id=<i>"@+id/b3"</i>
android:layout_width=<i>"50dip"</i>
android:layout_height=<i>"50dip"</i>
android:layout_gravity=<i>"center"</i>
android:background=<i>"#FFFF00"</i>/>
</FrameLayout>
</FrameLayout>
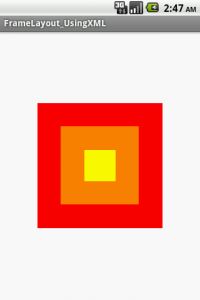
And you will get the output like this,
For getting the clear idea you can find the source code of FrameLayout here.
For any query, feel free to comment..!!

