How To Make A Scrolling Photo Gallery With UIScrollView
This tutorial will guide you through the process of creating a scrolling paged photo gallery using UIScrollView.
Specifically you’ll learn how to set up the UIScrollView in programmatically, and how to add the no of UIImageView as a subview and represent as a GRID.
Steps To Make A Scrolling Photo Gallery With UIScrollView
Create New Project
Open Xcode
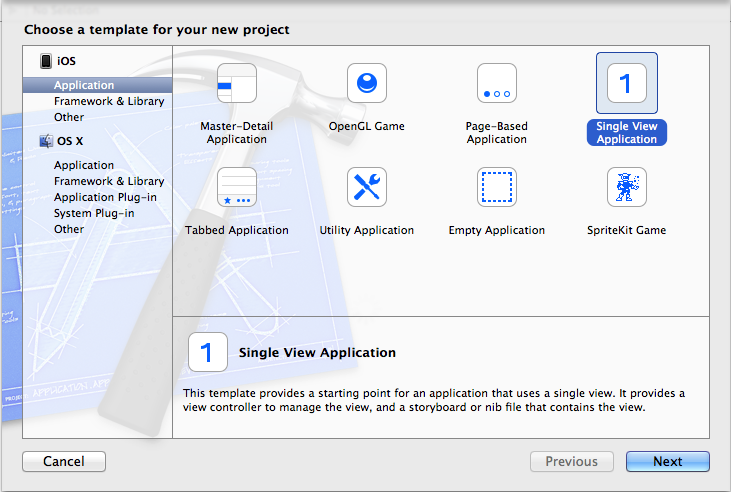
Select iOS -> Application -> Single View Application

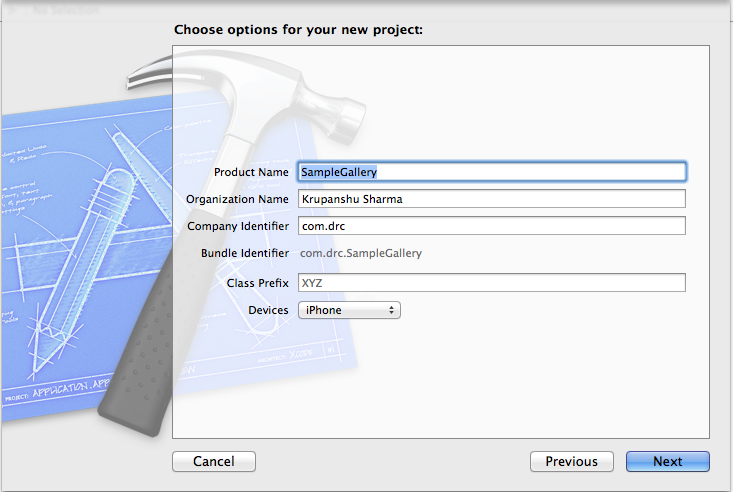
Click Next and modify below things

Product Name : SampleGallery
Device Name : iPhone
Use Automatic Reference Counting : CHECK
Click Next and save the project at your desired place.
This is how your project looks initially. Uncheck options for “Landscape Left” and “Landscape Right“.
Now Go to ViewController.h
Add following line of code
UIScrollView *scrollView;
UIImageView *imageView;
NSMutableArray*images;
This how your ViewController.h file looks. i have added comments in the code to understand the use of variables. incase of any query feel free to comment.
@interface ViewController : UIViewController
{
<span style="color: #ff6600;">// Scrollview
</span>UIScrollView *scrollView;

<span style="color: #ff6600;">// Imageview (which we are goging to create dynamically and add in scrollview)
</span>UIImageView *imageView;

<span style="color: #ff6600;">// Array of imagename
</span>NSMutableArray*images;

}

@end
In ViewController.m file viewDidLoad method
Add an image to the project. drag and drop it in to the project and add it. name it as “sample.png”
Initialize the array and add the image name “sample.png” in to array. This is how your method looks.
- (void)viewDidLoad
{
    [super viewDidLoad];
<span style="color: #ff6600;">    // Initialize the array and add the image name "sample.png" in to array.
</span>
    images = [[NSMutableArray alloc] init];

    [images addObject:@"sample.png"];
    [images addObject:@"sample.png"];
    [images addObject:@"sample.png"];
    [images addObject:@"sample.png"];
    [images addObject:@"sample.png"];
    [images addObject:@"sample.png"];
    [images addObject:@"sample.png"];
    [images addObject:@"sample.png"];
    [images addObject:@"sample.png"];
    [images addObject:@"sample.png"];
    [images addObject:@"sample.png"];
    [images addObject:@"sample.png"];
    [images addObject:@"sample.png"];
    [images addObject:@"sample.png"];
    [images addObject:@"sample.png"];
    [images addObject:@"sample.png"];
    [images addObject:@"sample.png"];
    [images addObject:@"sample.png"];
    [images addObject:@"sample.png"];
    [images addObject:@"sample.png"];

<span style="color: #ff6600;">    // Call Method "CreateImageGallery" here
</span>
}
Create a method and give the name “CreateImageGallery”.and modify the code like below. i have mentiod the coments for each peace of code in case of any query feel free to comment.
This how your method looks
-(void) CreateImageGallery
{
<span style="color: #ff6600;"> // Create and set scrollview properties
</span>
scrollView = [[UIScrollView alloc] initWithFrame:CGRectMake(0,20,320,548)];
scrollView.showsVerticalScrollIndicator=NO;
[scrollView setBackgroundColor:[UIColor clearColor]];
scrollView.pagingEnabled=YES;
scrollView.directionalLockEnabled=YES;
scrollView.bounces=YES;
[scrollView setCanCancelContentTouches:YES];
scrollView.userInteractionEnabled = YES;
[self.view addSubview:scrollView];
<span style="color: #ff6600;"> //The x and y view location coordinates for your menu items
</span> int x = 20, y = 20;
<span style="color: #ff6600;"> //The number of images you want
</span> int numOfItemsToAdd = [images count];
<span style="color: #ff6600;"> //The height and width of your images are the screen width devided by the number of columns
</span> int imageHeight = (240/3), imageWidth = (256/3);
int counter=0;
int decrement=numOfItemsToAdd;
int lastx=0;
int lasty=0;
int contentwidth;
int contentheight;
<span style="color: #ff6600;"> //The content seize needs to refelect the number of items that will be added
</span>
for(int i=1; i<=numOfItemsToAdd;i++)
{
x=15;
for(int j=1;j<=3;j++) { if(j!=1) x=x+20+imageHeight; if(decrement>=1)
{
imageView = [[UIImageView alloc] initWithFrame: CGRectMake(x, y, imageWidth, imageHeight)];
<span style="color: #ff6600;"> //set image to each imageview
</span>
imageView.image = [UIImage imageNamed:[images objectAtIndex:counter]];
imageView.userInteractionEnabled=YES;
imageView.multipleTouchEnabled=YES;
<span style="color: #ff6600;"> //add tag to each imageview in grid
</span>
imageView.tag=counter;
NSLog(@"%d",imageView.tag);
<span style="color: #ff6600;"> //add tap gesture to each image view in grid
</span>
UITapGestureRecognizer *tapRecognizer =
[[UITapGestureRecognizer alloc] initWithTarget:self
action:@selector(handleSingleTap:)];
[tapRecognizer setNumberOfTouchesRequired:1];
[imageView addGestureRecognizer:tapRecognizer];
<span style="color: #ff6600;"> //add each imageview to grid scrollview
</span>
[scrollView addSubview:imageView];
counter=counter+1;
<span style="color: #ff6600;"> //for scrollview widh and height set
</span> if(decrement==1)
{
lastx+=x;
lasty+=y;
}
}
decrement=decrement-1;
}
y=y +imageHeight+20;
}
<span style="color: #ff6600;"> //last image x and y coordinate
</span>
NSLog(@"%d %d",lastx,lasty);
contentheight=lasty+120;
contentwidth=lastx;
<span style="color: #ff6600;"> //set scrollview contentsize
</span>
[scrollView setContentSize:CGSizeMake(contentwidth ,contentheight)];
}
Add following method from where you can get the “TAG” for each imageview.
- (void)handleSingleTap:(UITapGestureRecognizer *)recognizer
{
    UIImageView *currentimage = (UIImageView *)[recognizer view];
    NSLog(@"%d",currentimage.tag);
}
Call the method “CreateImageGallery” in viewDidLoad method. write below line in viewDidLoad method
[self CreateImageGallery];
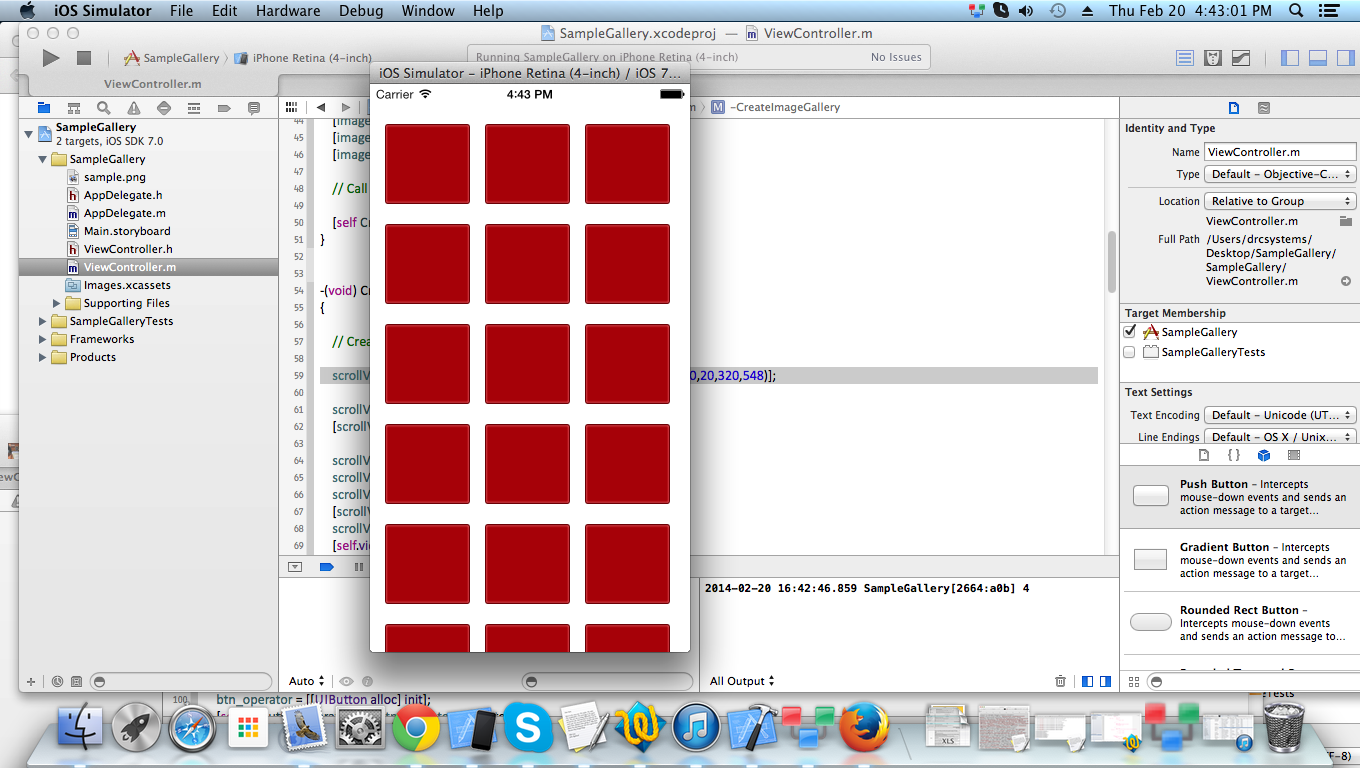
Now save and run your program. This will look like below.

If you click on any image, in the console you can see the log which print the TAG associated with imageview.

Thats it 🙂 Have fun and in case of any query feel free to comment. you can download the source code from Here.
